Using Starboard Software
Getting started with Starboard software
Starting the Starboard
1. Click the Starboard icon on your desktop.

2. If the desktop icon is missing search "starboard" in Windows.


3. Select standard settings for a new session profile window.


Floating Toolbar
1. Select color, highlighters, lines & shapes.
Pens: Default pen used for drawing
 Intelli-Pen draws auto adjusting lines & shapes.
 Default pen used for drawing
 Intelli-Pen draws auto adjusting lines & shapes.
 Color:  Black
Black  Red
Red  Blue
Blue  Green
Green
 Black
Black  Red
Red  Blue
Blue  Green
Green Stylus: Highlighter
 Select Color
 Highlighter
 Select Color
2. More Options & Accessories.

Annotate & Save Starboard Files
The following guide lists steps to draw and save a document.
1. Starboard software starts in Normal-Pen mode to draw on whiteboard.
 to draw on whiteboard.
 2. The Status bar in upper corner displays pen type and page number.
 in upper corner displays pen type and page number.
 3. Toolbar in lower corner has pen, color, and line properties.
 has pen, color, and line properties.
 4. Page will auto scroll or will manually scroll creating an infinite work space.
5. Save a document when closing the Starboard software. The file saves as a *yar file
and be re-opened using the Starboard software.
6. To save as a PDF go to print menu and select Microsoft print to PDF.
The Interactive Desktop
Use Desktop mode to interact with the computer & draw on the desktop.
1. Select mouse icon to interact with computer & desktop.
 to interact with computer & desktop.
 2. In desktop mode use the Select tool  to open files and select objects.
 to open files and select objects.
 3. Desktop mode creates new page and uses the desktop as a whiteboard.
4. To annotate on desktop select normal pen activating options on toolbar.
 activating options on toolbar.
 5. Select previous page or select the new page icon
 to start another page.
Whiteboard Mode Desktop Mode
 or select the new page icon
 to start another page.
Whiteboard Mode Desktop Mode


Screen Capture & Recording
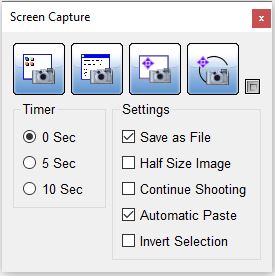
Select Accessories icon to access screen capture and recording settings.
1. To screen capture click accessories icon and select screen capture in drop-down menu.
 and select screen capture in drop-down menu.
 Select screen capture: Desktop/Window/Drag/Freehand. Save as either a *png, *jpg, or *bmp file.


2. To start screen recording click the accessories icon and select screen recorder.
Press record to begin.When finished press the stop recording button and save as a *.wmv file.
 and select screen recorder.
Press record
 to begin.When finished press the stop recording button and save as a *.wmv file.
Uploading Images
Use the Gallery tab to upload and use images for classroom instruction.
1. Select gallery tab to upload files or search images by selecting the My Files icon.

2. Resize images using Select tool change to Normal-Pen mode when finished.
 change to Normal-Pen mode when finished.


